Now, Gunji did his amazing tutorial in month long increments. As I'm going to have this Highlander done in the next day or two, I'm going to stretch them to a week at a time for updates to give people time to work and play catch up. If you need more time, by all means use it! I'll monitor the thread and answer any questions you might have as we go. So, first up is a list of supplies that I'll be using. Feel free to substitute for anything you want because it's YOUR miniature and you can, at the end of the day, paint it however you want and with whatever brand of paint you want! I use whatever's on hand so you'll see me jump between three different companies paints for this tutorial!
Paint: (there might be more, this is just what I found on first inspection)
Reaper Templar Blue
Reaper Ashen Blue
Privateer Press Paints (P3) Morrow White
P3 Khador Red Highlight
P3 Iosan Green
P3 Sanguine Base
P3 Umbral Umber
Citadel (Games Workshop) Lothern Blue
Citadel Nuln Oil
Citadel Ironbreaker
Tester's Flat Black Acrylic (or substitute with Aircraft Interior Black if you can't find the flat, like me!)
Brushes:
Winsor & Newton University Series 233 size 1 pointed
Citadel Fine Detail Brush
Size 1 flat brush
Gear:
paper clip
pliers to cut paper clip
exacto knife
Loctite Super Glue
Okay, that should get us set! I'll also include a link to the LivePaint I did last year for the Osteon B as many of the same steps (actually, they really are the same steps!) are used!
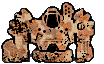
Okay, Step One is assembly though the only photo I have is for priming. Bear with me!
I start out and clean the miniatures with an exact knife, check for fitting, and modify the Highlander's legs so they can flex some. This is accomplished with a cutting plier set designed for small work. I snip the hydraulic lines so the legs are more positionable. I also pinned the torso to the hip piece just in case. I'm using Loctite Super Glue from Walmart (liquid, not gel.) I also filled a hexes with DAP Patching Plaster and allowed it to dry. The Highlander doesn't have a base piece to stand on so it does need a base! I also used a pin vice to drill four holes in the top of the head and then glued fishing line into them at various lengths. The piece count is as follows:
Head, Torso, two upper arm pieces, two lower arm pieces (gauss, SRM-6) and a left hand, hip piece, two upper leg pieces, two lower leg pieces, and two feet pieces. So fourteen pieces.
To Prime, I used Testor's Aircraft Interior Black Acrylic paint to prime with as I can't find any Flat Black around here at the moment.\

Step 2
Once everything is good and dry, I take my Templar Blue, squeeze out some onto a plastic blister top, and use the Number 1 flat brush to paint all of the areas I want to be "Donegal Blue-Grey" (which is all of it!) Nice and thin coat is great; might even give it a second if there's too much black showing. I usually leave areas I know will be a different color (like metallic silver) for later at this step.

Step 3
The final step for this week will leave us where the miniature is as of this writing. I take the Citadel Nuln Oil and wash the entire miniature. This darkness the blue and hopefully pools in the lines and recesses of the unit. It looks pretty hideous at the moment, but we are getting there!

If you feel like cheating a moving on to Step 4, I'll be taking the Templar Blue and filling in the panels with the Winsor & Newton #1. Reference the Osteon tutorial for more info if you are anxious to move on!
Okay, little late on my end, but moving is no fun. Moving is no fun when the wifey is all in a tizzy over everything and has decided painting time is really moving/packing/baby sitting time. But, moving along!
Step 4
So as I alluded too in my last instructional post, you are going to take Templar Blue, put it on your palette, water it down just a little, use the pointy #1 brush and paint each panel. I'd paint almost all of it for this scheme because the blues will blend together as we go.

Step 5
Now, the "complicated" part. On your pallette, drip out three drips of Templar Blue. Then take your Ashen Blue, and drip out two parts. mix this together, and paint each panel about 3/4 or so with this mix, taking care to try to simulate where your light source might be coming from (for me, it's always from the upper left side.) Each panel will eventually have a "gradient" painted on it.

Step 6
Add two more parts of Ashen Blue to your mix and apply about 1/2 of each panel. This photo didn't turn out well (yay iPhone 4S) and you can't tell much of a difference. You might not be able to in person either (sometimes I can't) but just trust in the paint/yourself/me and we'll keep moving along! If it really bugs you, add a little more Ashen Blue (or highlight color of your choice) and you can make it change!

Step 7
Our final step for this post, use pure Ashen Blue on roughly a 1/4 of the panel, maybe a little more depending on how the last steps went. It may or may not stand out really well from what you've done so far. No worries, future layers will blend it a little more!

I do apologize for the quality of the photos, but my good camera and photo set up is packed away at the moment. The final photos will be CSO/print quality and you'll be able to see stuff. If it's a deterrent to you learning then, well, i'll try something. Sorry!
Okay, have Internets tonight so I'll move on:
Step 7 perhaps?
For this one, I've added the final under layer which is a mix of roughly three parts Ashen Blue to one part Morrow White (confession time: I tossed my Morrow White in the move thinking it was an empty/dried up bottle I had... so of course the local store didn't have it and I've subbed with GW's whatever they are calling their pure white this week.) This is less than the last layer obviously but not an edge highlight (aka, just making a very fine line.) We'll do that in a second! I also took the time to add decals as the next step will need to possibly go over them a few a little.

Step 8
This is the battle damage step. I bought a sponge at Walmart a few years ago and just grab a small chunk off of it (roughly nickel size) and use that for my application tool. I dip part of it in P3's Umbral Umber, hit a paper towel to remove excess and then carefully apply it. Too much can be bad and can ruin all of the work you just did, so use it sparingly. Alternately, you can use an old brush, dip the tip, again remove excess, then splotch your work. Allow it to dry before proceeding to the next step! Now, if this isn't your thing, I suggest skipping this step. It's not for everyone, but I'm just detailing how I work!

Step 9
Here's probably the worst step in the whole process. You are going to mix up your paints 3:3 Ashen Blue to White. Then using the itty bitty Citadel Fine Detail Brush (or whatever your equivalent is) you edge paint extreme edges of your gradients and also paint the lower areas of the battle damage. Light has a tendency to hit those lower areas, at least in abstract miniature painting theory, and highlight those. A very steady hand is needed for this, I won't lie. It took me a while of practice back in 2004 or 2005 when I started to paint in this manner. Keep at it and don't give up!

Thats it for now. If you want to cheat on into step 10, coat all of the parts that you feel are metal with a darker metal color (GW Ironbreaker for me) and get set!
Okay, here's a photo of the sponge and the little bit I used. The main section is about four or five inches long. And yes, this is several steps past where I left off, but inquiring minds wanted to know!

As for glazes to make the transition smoother, yes to all. It is possible. It also takes more time. Case in point, along with this Highlander I'm also paint up another seven units in the same scheme and it would slow me down so I let the scale do the blending for me if that makes sense. As long as you are "close" its usually not terribly obvious. At least on two inch tall mechanical figures!